Tuesday, September 16, 2014

DIY Removable T.V. Tray Ironing Pad


I recently needed an iron. I've done great sewing and not having one so far but I finally started a project that I NEEDED one. My wonderful mom bought me one but I still needed an ironing board. Not wanting to ruin a perfectly good t.v tray with a staple gun, I decided to make something less permanent.

I made some pot holders with a heat resistant type batting and had some left over. I also happen to have a big piece of yellow fabric left over from a diaper cover I made. Put these two together and BAM I have something wonderful.

First I measured my table. I would assume this is a standard measurement but we all know what happens when one assumes. With that said, you should probably measure your own t.v tray. I cut my batting to be 18" by 19" doubled.  This left me a little extra to go over the sides of the tray.  (I don't want to ruin my tray and thought that two layers of batting should keep it protected. You could probably use one layer though, it's really your preference.)

Lay your cotton fabric print side down on the floor or another flat surface that you can easily walk around. Once everything is flattened, lay the batting on top. You want to make sure you have about 6" extra on every side.


I marked out 5" and 6" on the cotton fabric every once in a while and connected the dots to give me a straight line. If you have a yard stick you could probably do this much easier without all the work.
 
Blue lines are the 6" mark on the sides and the pink is the 5" mark.
I drew straight down on the corners of the batting.


Once you have the lines drawn, cut around them to create something that looks like the picture above.
 
Once everything was cut and ready, I pinned the batting square to the cotton. I would pin this often because it can/will shift. If you use one layer it won't shift as much but I used two layers causing more shifting.
 
I don't really know why, but I cut the corners of the batting. Maybe to give me more play in the corners....not really sure and is optional.


After everything is pinned, sew the batting onto the cotton.
 
 
It will probably look something like this once your down. Some of the fabric bunched a little, but this wasn't very notable once I add the elastic and put it on the table. 
 
Next you want to sew the corners together. I put my 5" and 6" lines together and sewed it from there.


After all four corners are done, pin a casing for the elastic. I will use 1/2" elastic and made the casing 1". It is up to you on how big you want your casing and elastic. I would recommend using a wider elastic since you'll need so much and it's going over a bigger object. 

BE SURE TO LEAVE AN OPENING to string the elastic threw....I always forget this.

Once your casing is ready, starting stringing it in.

My elastic measured 33.5". This held the pad on tight while easily stretching over the table. Make the elastic shorter if you want the pad to be on tighter.  (Put a safety pin on the end being run through the casing to help you hold on to something while moving the fabric.)


I clipped the end of the elastic to the opening to make sure it didn't get lost.

Yup the first time I ran the elastic, the end without the safety pin went right in. I had to start over so I clipped it to prevent it from going in the casing.....again!

Once it's all the way in, sew the elastic together. I should of taken a picture of this but sadly didn't. Try the pad on the table before you completely sew the hole up. If you want the pad to fit tighter cut and resew the elastic together. If you want it bigger, cut it and add more elastic. Sew on both ends to add more.

If you are happy with how the pad fits, close up the opening.
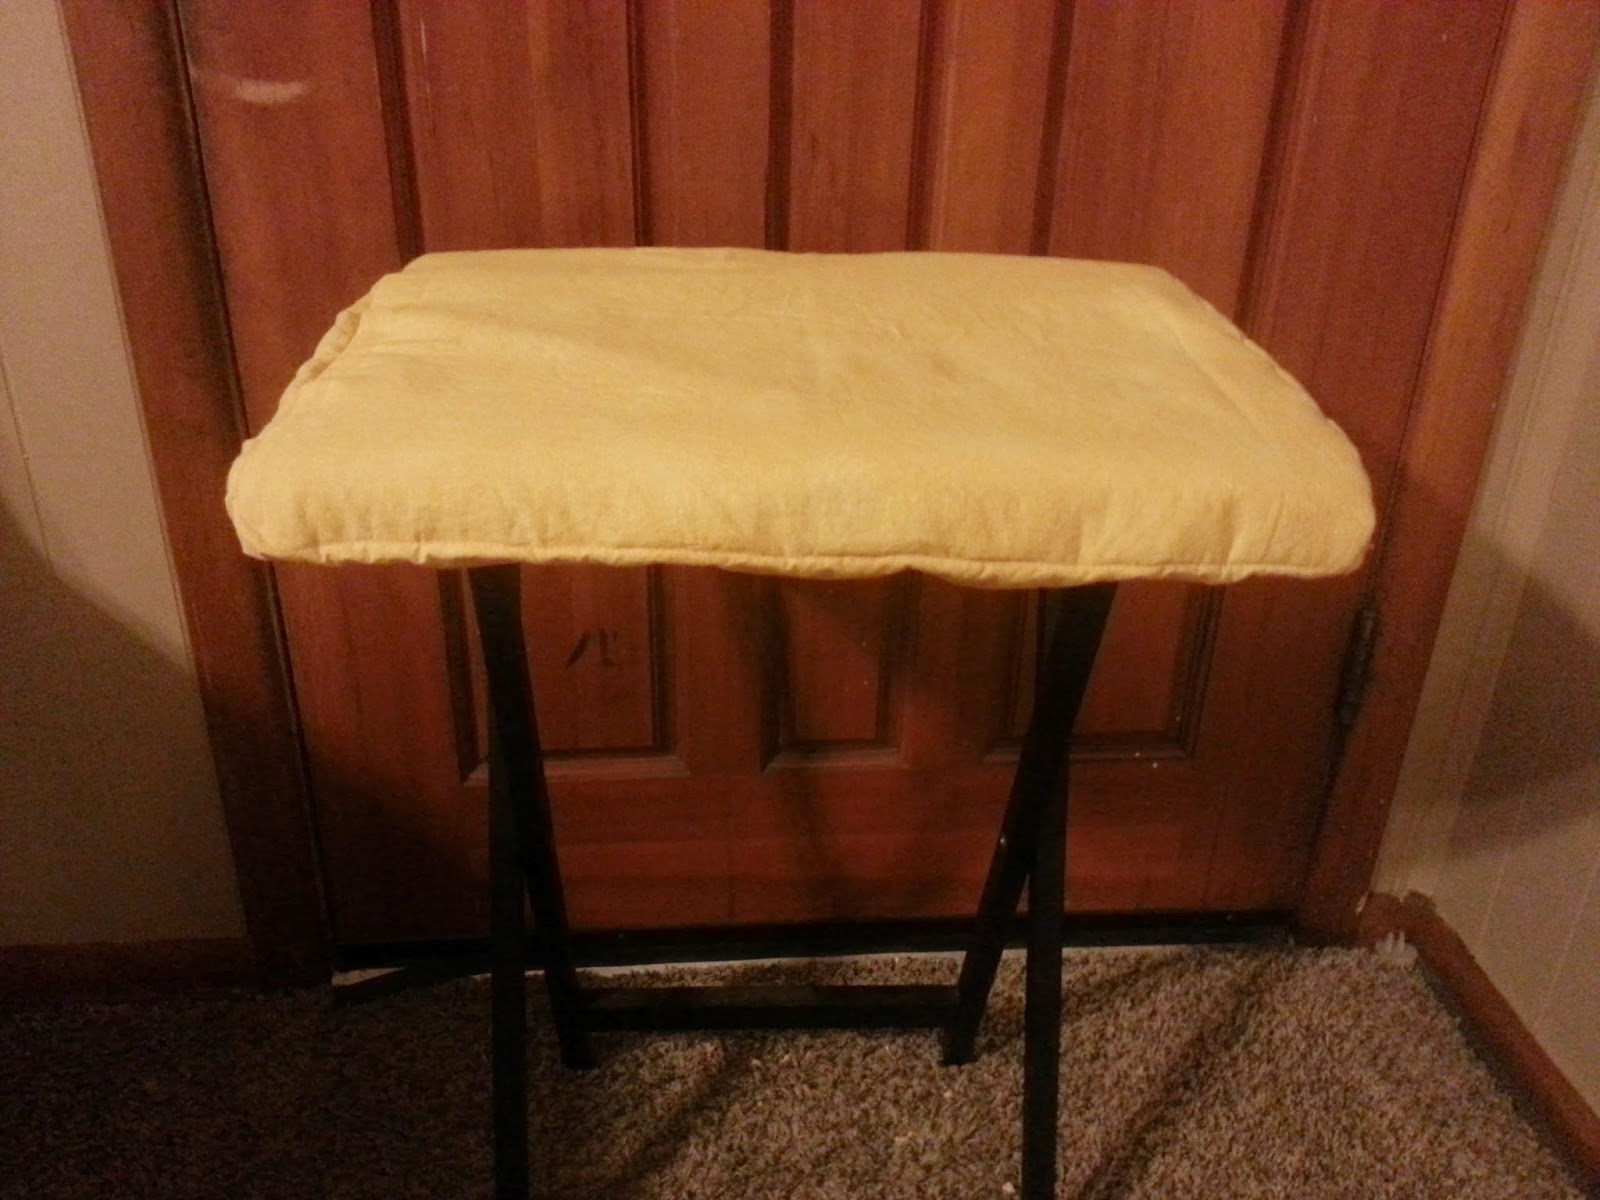
 
My finished product!!!! Works great for what I use it for. This comes off easily to free up a tv tray or keep it on and store the whole table.


Hope you find this as useful as I do!!

God Bless.


Wednesday, September 10, 2014

Easy Sewing Baby Blanket!!


The other day I was at the fabric store and they had this Ultra Cuddle fabric on sale. It's perfect for blankets and with cooler weather upon us I thought I would make one for my son. Not that we need yet another blanket....but it'll be made by me so it'll be awesome!!

I haven't made a blanket before, and I haven't read any things on how to do it. I just went for it, like usual.

The cotton fabric I had was 35" width and 38" length. The width you can kind of choose depending on the fabric but I've learned this is kind of standard. Of course the length can be changed by how much you buy (by the yard, 36" in a yard). I always buy a yard and a half which gives me some play room.

Since the cuddle fabric stretches I decided to do one side at a time, but if you are brave enough you can pin all of them at once.

First I laid my fabric on the floor and made the first side even. I left the cotton fabric an inch over the cuddle fabric. This gives me enough to fold it and sew. I would like to add that this was roughly an inch. If I was making this to sale I would measure but this is an experiment and decided not to.

Second, fold that extra inch of fabric in half, so you'll have 1/2 an inch. Then fold it again, but over the cuddle fabric. This will prevent the cotton from fraying and give the cuddle a nice border.

 
This is my cotton inch that is longer than the cuddle fabric.

 
I folded it in half, giving me half inch. Try to line the cotton up with the cuddle fabric.
 
 
I then fold it over the cuddle fabric and pin. You want to be sure you have the cuddle fabric inside that little pocket. If it's not in there all the way it has a greater chance of coming out. In one spot I didn't have the cuddle fabric in all the way and it easily came out just by me moving it.

IF THIS HAPPENS..... When this happened to me, I simply lined the cotton and cuddle fabric and sewed it. I tried to hide the stitch as best as possible, and if you use a small stitch it should be hidden by the fabric's fuzziness.

It's up to you on how to do the corner. I simply just folded the fabric so there were no raw edges.

TIPS:

- At the corners, try to have as little cuddle fabric as possible. You want it in the corner so it keeps but you don't want so much it bulks up. This Ultra Cuddle Fabric is semi thick and my machine didn't want to go threw five plus layers of cotton AND the cuddle fabric. I just cut it a little bit more, just remember to cut a little at a time.

- The cuddle fabric DOES stretch so after that first side, don't stretch it too much. This might prevent the blanket from laying flat. I didn't stretch it at all when I began sewing the other sides, I even left a slight slack.

-When going through the machine be sure to have a good grip on all the fabrics. This keeps things from shifting. I would also recommend keeping as much of the blanket as possible on a surface while you sew. It can get heavy and the tension makes things difficult.

-I used a small close together zig-zag for my stitching. This helped to make sure all the fabrics were hit and held together tightly.

-Stop frequently so insure everything is in the right place.

I hope you enjoy. If you're into camo, I do sale these on my Etsy store here. It's not much but I've sold a few things.

Thank you and God Bless.

Please Go and Like My Facebook Page!!!!

Wednesday, September 3, 2014

Hot Glue VS Mod Podge


I saw these leaf candle holders and fell in love with them. I'm not one to decorate my house according to the seasons (because my kids would just take it down and probably ruin it) but I couldn't resist this one.

When I saw it on Pinterest, it said to use Mod Podge. It also said you could use real or fake leaves. I found a bag of 50 at Dollar Tree and snagged them up!! I don't know how either of these would work on real leaves. I would suggest using freshly fallen ones, because once they get dry they would probably crumble when trying to use them. I also don't think real ones would work if you are wanting to make something to last more than one year.

MOD PODGE!!
 
I simply put a nice layer of Mod Podge on the glass jar, and started layering leaves on it. I had to completely cover all the leaves in a layer of Mod Podge due to some leaking around the edges. It made the leaves glossy looking and more fake then they already were. The Mod Podge also didn't dry fast enough which meant the leaves would move around and not stick very well until it dried. I had to put this together through out a day in order to get it covered. Just took too long and looked too fake.
 
 
You can try this if you want but I wanted something faster. If you use real leaves, it might work better at sealing them.
 
HOT GLUE!!!!
 
Sounds crazy, but I just recently got a hot glue gun and was super eager to try it out. I thought this would be the perfect project.  I got my jar and leaves laid out and ready to go!!
 
 
The leaves I used were thin and made with a silk material. Use the SMALLEST amount of hot glue possible, other wise it will seep through the material and stick to your fingers. Just the smallest dot will do. I started by putting it on one point and placing that on the jar. The glue dries fast so know were you want to put it. Once it was on the jar I added dots to the other ends and stuck them to the jar also. It went by pretty fast and even better since the glue dried almost instantly.
 
 
When I was all done, I had a problem. The bottom wouldn't sit evenly due to ends of leaves. On the Mod Podge one I stick them to the bottom, but it still kind of rocks and doesn't sit flat. If you plan to put a candle in, that is an important part. On the hot glue one I decided to just cut and make it as even as possible without it looking like I cut it once in the sitting position.


I loved this and plan to make candles with them (rather than put a tea light in it). Here are my two side by side.
 
 
As you can tell the hot glue one is less shiny looking and I liked it better!! Hope you enjoy trying to make your own!!
 
God Bless!


Wednesday, August 20, 2014

Mega Block Numbers


I'm trying to teach my daughter her numbers. Sesame Street is doing a great job helping, but I can't play that show all the time.

I was trying to think of a way that my daughter can play and learn her numbers. I don't really like those magnetic numbers/letter because she likes to run off with them (and my ten month old likes to eat them). I would be VERY upset if she put one of those magnets on anything electronic and it fried.


SOOO I simply got a sharpie and ten blocks. Wrote the numbers 1-10. You could also make the numbers by using stickers, or vinyl. You could print colorful ones off on paper and Mod Podge them on. The ideas are limitless!!!!

She loved it!!! Thought it was really cool that she could stack her numbers and be hands one with them. This would be a great stocking stuffer idea too (yea I'm already getting into that mind set...helps the spending be spread out).

I know this is really simple, but any young child who is trying to learn will love it. It'd be cool also if you could do the alphabet, but it's hard to find that many of the same type of block.

Enjoy! God Bless!!

Wednesday, August 13, 2014

DIY Baby Pants


I have looked multiple times on Pinterest to find a good and simple way to make baby pants. Of course my first pants were a fail. They still turned out like pants, but I wouldn't let my daughter wear them in public. After making the first pair, I knew better on how to do things. See all the other posts I've seen make things complicated and didn't make thinks clear (or my first pair wouldn't of been so bad). With this in mind I thought I would make my own post in hopes of simplifying things for beginner sewers.  Here goes nothing....

First: I used a pair of pants that I knew fit my son, and used this as my pattern. Make sure the fold is tight on the fabric and the pants. If you have too much slack in the pants and it's not smooth, something will most likely not match up.

I used a marker (yes, Crayola markers wash off fabric) to outline the pants. I tried to get as close as possible to the pants without moving them. After I drew the pant outline, I also drew a line to give me sewing room. You can also just cut away from the pants pattern, but I like to see how much play room I have.  I did make a mistake that I never read on other blogs and would of been nice to know.

See how the top of the pants have the elastic and it's at a relaxed state. If you draw your pattern with that, than add elastic, it won't leave enough room to stretch over those diapers. SOOO..I would recommend pulling that out and drawing your design with the fabric stretched at the top. You can do this by having someone hold it for you while you draw, or pin it using some type of clip. If it's stretched, it gives you enough stretch to go over those cute baby butts. This is VERY important if you are using a fabric that doesn't have much stretch.
 

Second: I cut my second line (the one that gives me seam allowance). I used regular straight edge scissors for this cut.

Still Folded

Laid out to prepare for sewing.
 
 
Third: You want to sew the seam that goes down the middle of the butt and front first. (I didn't see this step and this is were my first pair got messed up).
 
Where you want to sew first. Looks odd, but I promise it'll be right.
 
Step Four
 
 
Four: Fold your pants so they look like actual pants again. I also cut the extra fabric off here, to keep the bulkiness down when you get to where all the seams meet. If you feel more comfortable leaving it you can, just cut the extra off after step six.
 
Five: Once folded, pin where you will sew to make the leg holes. Than sew away!!!
 
 
Six: Once everything was done, I used pinking shears to cut the extra fabric off. This will help prevent the fabric from coming undone later down the road. If you don't have these, no big deal!! Just be sure to use a zig zag machine setting. Mine here is, but it's so small and tight together you can't see it.


Seven: I folded the pant legs to sew next. If you want to do elastic here too, simply make a casing and add elastic. I don't really like those myself and don't put my kids in them. I would recommend ironing the fold, but it worked just fine by pinning it.
 
I want to point out something very important here. Make sure your legs are the same length. Due to human error, it most likely won't. One will probably be just a tad longer than the other. I folded my pants in half and checked the leg lengths.
 
 
Pick which one you want to unroll or roll more and pin. Check again to be sure you have it right. Don't want anyone to be walking around with one high water. lol
 
 
Eight: Since I'm NOT making a casing, I simply made a zig  zag seam across the bottom. You want to sew as close to the edge of the pants as possible. 
 

Nine: After both legs are sewn and looking neat, cut the extra fabric. I once again used pinking shears but it's up to you (and if you have a pair or not).

Ten: Let's start with the waist band!! I folded it over and pinned it. Add about 1/4 inch more than the elastic you want to use. I am using 1/2 inch elastic with a 3/8 inch casing. To make things simple you could also do 1/2 inch casing with 1/4 inch elastic. You just want to make sure you have enough room for the elastic (but not too much or it might start twisting and we all hate that!)
         *Side Note: When I need something to be folded to a specific measurement, I use ruler and
            make dots. Go along the edge of the fabric with the end of the ruler. Every once and a while
            put a dot at the measurement (like at 1/2 inch down from the fabric edge). This helps me
            to have a guide when I'm folding over and pinning my fabric, and to be more accurate.
 
BE SURE TO LEAVE AN OPENING TO PUT ELEASTIC IN!!!
How do I always forget when sewing??? I have no clue, but I do almost every time! 
 

If one side is longer than the other...no problem. I simply used a ruler and drew a line to show the difference. This helped guide me when sewing.


Eleven: Once my waist was sewn and I had my case; I measured my elastic. I'm sure you can look and find the standard for different sizes, but I simply measured my little man while he was awake. I understand that can be difficult for smaller children, or ones who don't stay still for one minute. I don't really know what to tell you other than try to find some measurements.
 
Twelve: Put a safety pin on the end of the elastic and thread it through. Once you have it all through, you want to sew it. I always add a little extra to give me room for this. It's difficult trying to hold the elastic and put the foot down on the machine, the extra helps to hold it in place.
 

I ALWAYS go over this a few times back and fourth. If you make it too small or too short, you can cut off and sew again or cut and add (sewing twice on each side).

 
My finished pants. I was really very pleased with myself and excited. Now my son can have pants to match his Camo Faux Vest Onesie!!!
 
 
Hope I explained things better, but just to be sure I made this simple picture to sew which seams to sew first!! Hope you enjoyed! God Bless.


Friday, August 8, 2014

Crazy Picture Frames w/ 4x6


I love pictures!! I usually do the prepaid thing on Shutterfly so I can get 200 4x6 pictures for $20. Every once and a while I'll blow pictures up bigger, but it can get expensive.

Recently my mother-in-law started a picture wall and I thought I would follow suit. I've lived on my own for almost three years now and I have YET to have family pictures on the wall. Maybe that's saying something about my family...no, I love them...really, I promise!

I put a post here that shows how I paint frames. Living in a rental, I think colorful picture frames liven things up a bit.

SOOOO I have these pictures I just ordered and big frames. I thought about it for a while and decided to use scrapbook paper and dress up the blank space. If you want to get crazy, go all out and do a whole scrapbook page type thing. I don't have time or care for all that jazz (I used to at one time and that's why I have the paper and other things).


I liked the stripe paper I had, but felt that the stripes simply going one way would make things too simple. The picture with one horizontal and one vertical made me decide to simply cut the paper into squares and layer them in all different directions. You could get a paper cutting tool to make a design, like all circles, squares, ect....


I made little name things that I drew myself, but I know not everyone has the time for that. You can buy those too if you really want to.

Enjoy!!!!!

P.S. These are my two beautiful sisters!

Thursday, August 7, 2014

DIY Photo Prop


Ok, so my kids have been sick, and I haven't been feeling well. After all that, my internet wasn't working. Sorry for not posting in so terribly long.

During all the craziness, I took pictures of my good friends little boy. He's turning one!!! How exciting right? When my daughter turned one I made the mistake of paying for pictures being done. I love photography and is something I do on the side and after I saw the price tag, I said never again!

BUT...they had this cute little cube that had numbers on it, used to tell the kids age (duh)! I have the picture with my daughter sitting on one in my living room and decided I was going to find a VERY cheap way to make one that I could use for my friends pictures (and my son here in a few months)

I started with a box. The picture I show isn't the box I used but it's square and gets the point across. If you're buying diapers (like me), those work great only if it's the small boxes (other wise you'll have a rectangle and I don't know how well that would look).


I used scrape book paper to cover the box. You could do this multiple ways.....
 
1-scrape book paper or any other kind of paper
2-white wrapping paper and wrap it like a present (my wrapping skills aren't very good)
3-skip the paper all together (paint box white first)
 
I stuck the paper to the box using Mod Podge. I just wanted to use that to be honest, I love that stuff. But you could use hot glue, regular glue, or tape maybe.
 

Once I had my paper on there all neat like (hahaha see those air bubbles?) I used a ruler and traced the 'inside square' part. I later freehanded the E, but you can use tracing paper, vinyl stickers, or one of those fancy cricket things.

Back to the air bubbles, they didn't show up in my pictures, much. If you're going to do super close up pictures it might matter but it's up to you on what you want to do about them. Photo shop anyone?

hmmm..maybe too much Mod Podge was the problem, I've been known to get carried away with that stuff.

I freehanded painting the edging, but you can use painter tape. I did try it on one side just to see, and it worked as long as you took it off while the paint was still wet. I used acrylic paint, because that's what I had on hand (and it's only $.50 at Wal-Mart).

It turned out really well and I can't wait to do one for my little man when he turns one!!

Here is a picture of my friends adorable baby boy.


As you can see, my box was even strong enough for him to sit on. Just be careful with that!! If that's what you're aiming for, you could always try to make the box stronger with sticks or something. I'm sure you could look around and find something!